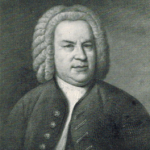
In today’s tutorial we will look at a fun and challenging J. S. Bach piece that will help kick your lead guitar playing up a notch or two.
Continue reading
In today’s tutorial we will look at a fun and challenging J. S. Bach piece that will help kick your lead guitar playing up a notch or two.
Continue reading
Want to play better lead guitar? One of the keys to playing better lead guitar is having good solid technique. The better your guitar playing skills are, the wider your improvisational possibilities become. And of course, the better your playing is, the faster you’ll learn your favourite songs note-for-note. In today’s tutorial we will look at a guitar arrangement for a violin piece written by Nicolo Paganini (1782-1840) called Perpetual Motion (Moto Perpetuo, Perpetuum Mobile).
Continue reading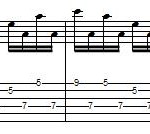
Want to improve your string skipping and stretching abilities on guitar? Want to learn a fun song too? Then you’ve come to the right place. Ostinelli’s Reel is an old-time country fiddle tune that sounds great on guitar. This short … Continue reading

Want to play better guitar? Whether you play country, rock, folk, blues, or jazz, here’s a fun song that sounds great on guitar and will help improve your overall guitar technique. This piece, called the “City of Savannah Hornpipe”, covers … Continue reading
You’ve heard that you should learn to play guitar scales, but let’s be honest…you would rather play your favourite guitar songs instead of playing boring old guitar scales.
So is it really worth investing some of your limited practice time into learning and mastering guitar scales?
Continue reading
I was surfing the net this morning and came across an Amazon.com listing for one of the guitar books that I wrote in 2005. The book is called Mega Chops: Scale Mastery Beyond Hanon for Guitar.
I was totally blown away when I discovered the price that one seller is currently asking for this book.
Continue reading
Very few guitar players know the secrets of how to practice for maximum results. Most players that know these secrets want them to remain TOP SECRET! Until now…
Continue reading